Sell a service, step by step
Something you already have, an API, a model, a data source or a tool, becomes a marketplace listing: agents find it on their own, pay per call with a signed receipt, and rate it from what they were served. A ready-made template, your whole API from the spec you already publish, a skill, time on your own hardware, and a service you describe yourself all go through the app's Earn page. Income per call, paid before you serve; no keys to issue, no accounts to open, no invoices to send.
What you need
- The app's Earn page at
/earn. - ZAI of your own to stake behind the listing: at least 100. The listing is live at 10,000 ZAI total, your own plus what backers put behind you; unset, the node stakes 10,000 when its wallet holds that much, else 100. And a little gas. On the local development network the node mints both for you.
- For a template that wraps a paid upstream, that upstream's API key.
- A machine or container to run the node on, or the local development network on your own
computer: from the repository root,
scripts/devstack.sh reviewstarts everything, the app included, andscripts/devstack.sh urlsprints where each part listens.
Steps
-
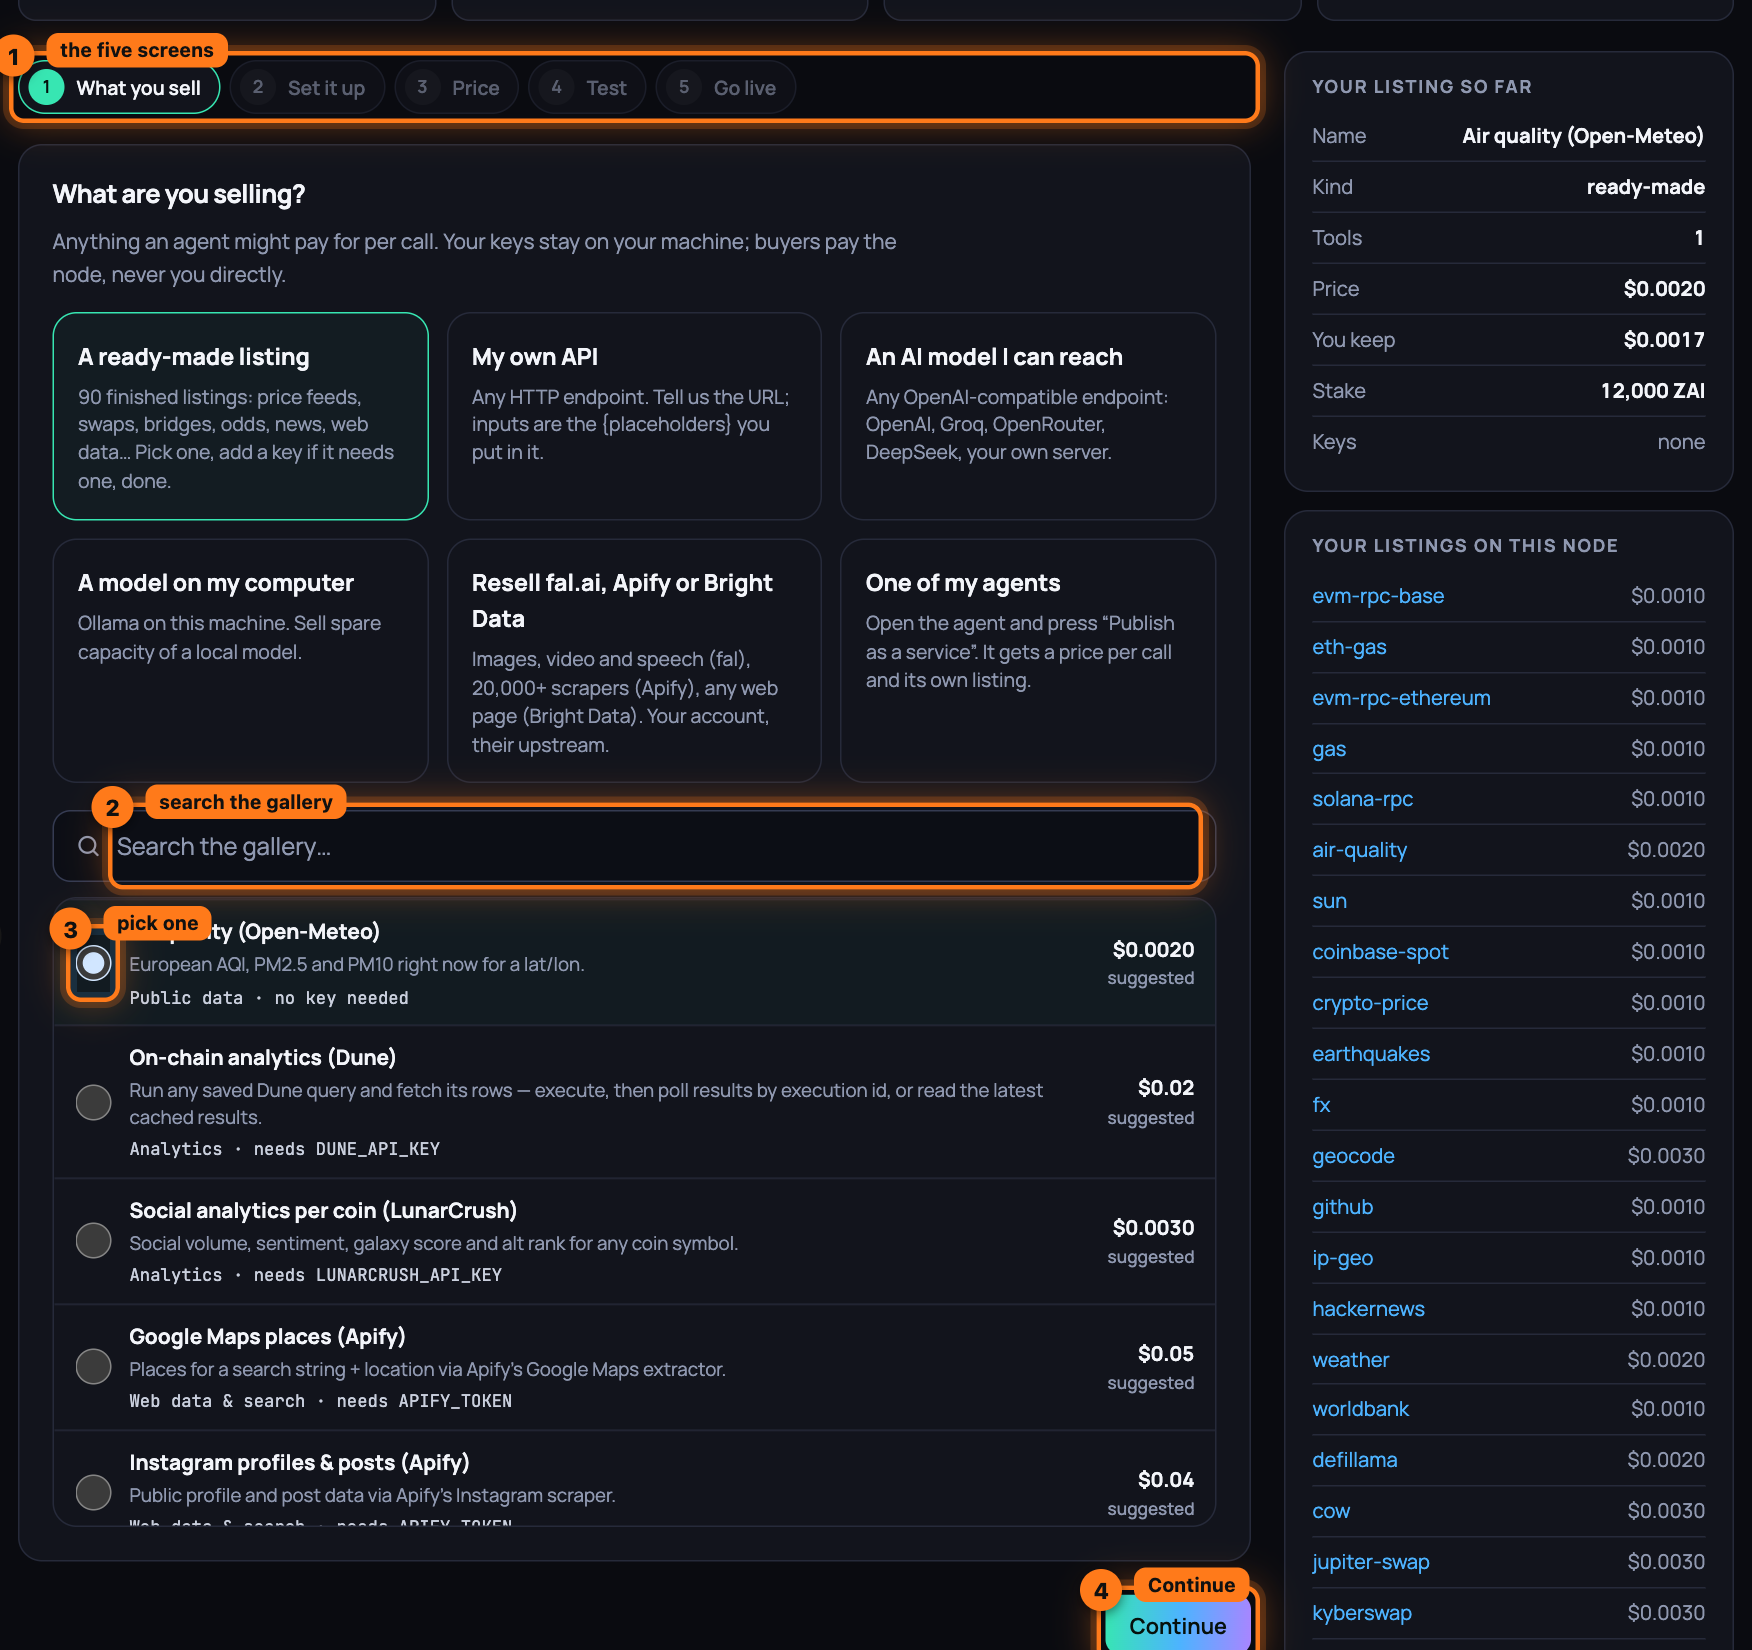
Open the Earn page. The builder runs across five screens named at the top: What you sell, Set it up, Price, Test and Go live. Continue moves you forward, Back returns, and a screen you have finished stays clickable.
-
Under What are you selling?, pick the card that fits: A ready-made listing, My own API, Import an OpenAPI spec, Sell a skill, An AI model I can reach, A model on my computer, Sell your hardware (your GPU or CPU: a buyer names a container image and a command, your node runs it with Docker; Sell your GPU) or Resell fal.ai, Apify or Bright Data. (One of my agents leads to the Agents page, where Publish as a service on an agent does the same job for it.)
-
For a ready-made listing, type in Search the gallery… and click the row you want; its radio button fills. The rows come grouped like the marketplace, and each says its group and what the seller needs, "needs nothing", "needs FAL_KEY", "needs Docker and a GPU", "needs Node.js (npx) and GITHUB_TOKEN", then "not verified yet" until its test call has passed against the real upstream, and a suggested price. A Verified badge marks one that has passed; Reaches into its node marks an MCP server that reads files, runs commands or drives a browser on the node that runs it. Sell your hardware shows the two hardware templates, GPU and CPU, with what each needs.
For Import an OpenAPI spec, fill in Spec URL and Provider name (and, when the spec leaves an input without a value, Values the spec leaves out), then press Read the spec: one row per operation with a box and a price per listing, one key field. For Sell a skill, choose Upload a zip or A folder on your node, name the file or the folder, and press Put it on the node: the node reads the folder's
SKILL.mdand answers with its name, description and licence.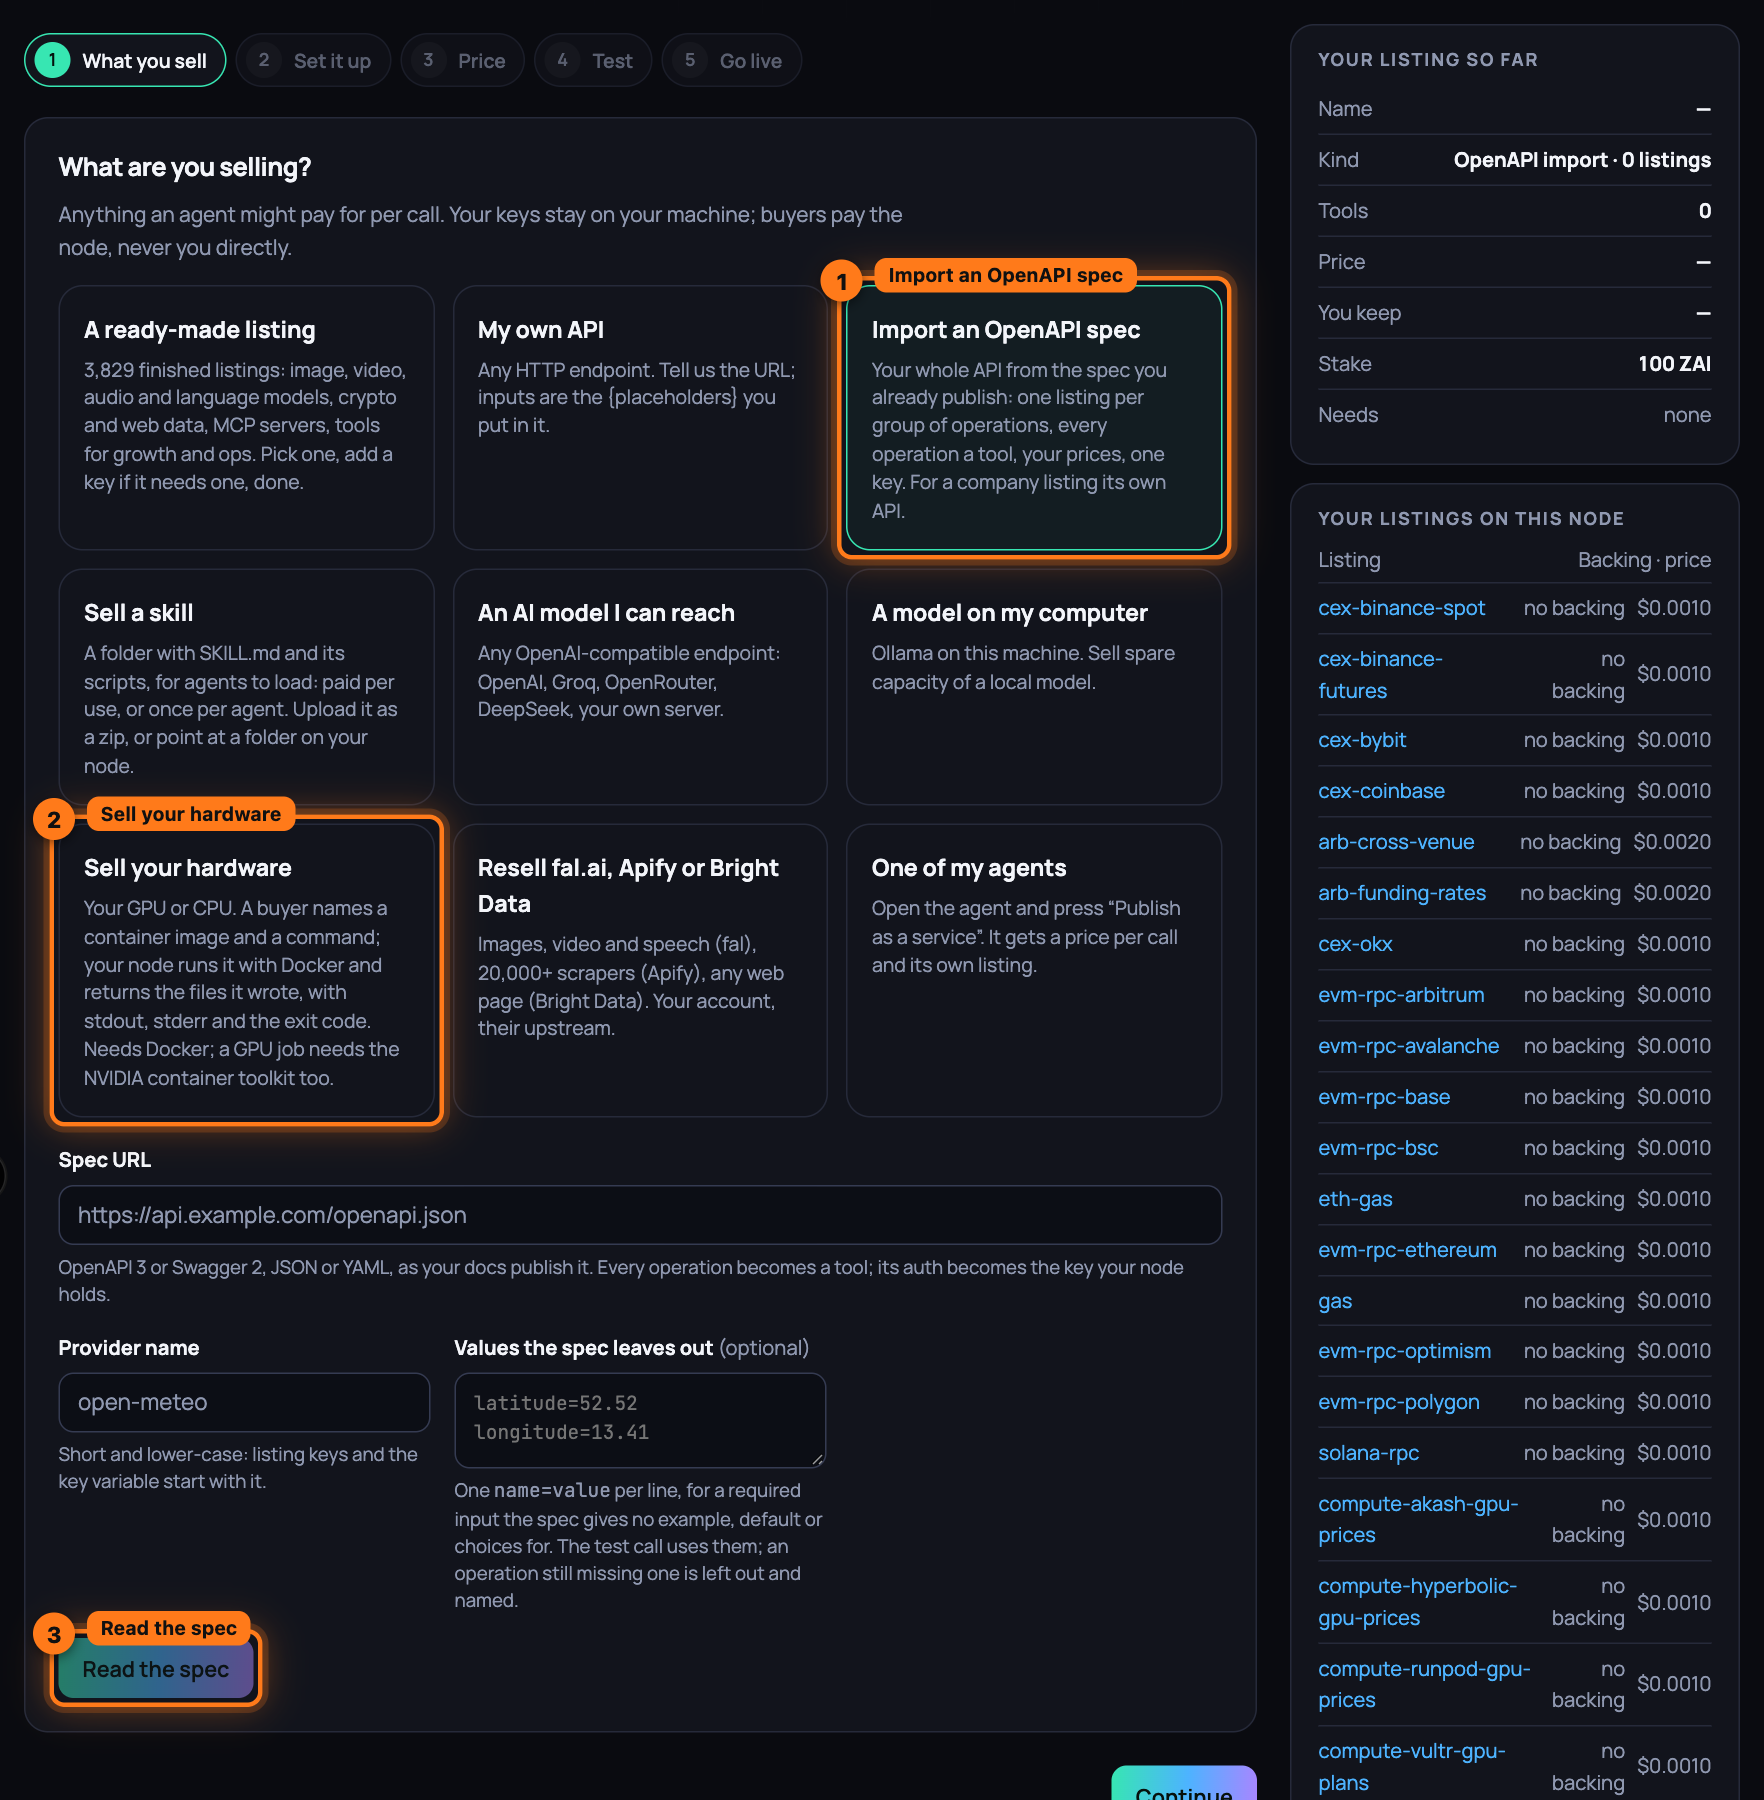
-
Press Continue.
-
On Set it up, fill in what your kind of listing asks for:
-
A ready-made listing shows its tools and either "Nothing to configure: it calls a public API." or one field per key, labelled with the variable name: paste the key there.
-
Your own API: Name, Group, What it does (the one line agents read), Method (GET or POST), URL with each input in curly braces,
{city}, and a secret written as{env:MY_KEY}; Headers through Add a header; JSON body for POST; Response path to return only one part of the reply. -
A model: Model, Base URL, Key variable name (for a model you reach over the network) and System prompt.
-
A wrapper: Provider, then fal model id, Actor id or Zone name.
-
An imported spec shows its listings with their operations and one field for the key; the line under it says every listing carries
provider.domain, and how to prove the domain is yours once it is live (step 16). -
A skill takes Name, Category tag, What it does (one line agents will read) and Terms: Per use (every load is a paid call) or One-time (an agent pays once and keeps it).
-
An MCP server your node starts itself carries the notice Runs on your node with the permissions you give it. One marked Reaches into its node shows, on Test it and Go live, the box "This server reads files, runs commands or drives a browser on your node. List it anyway.": tick List it anyway or Go live now stays disabled (MCP servers as listings).
Any key your listing needs gets a field under Keys to test with. It stays in the node process; on a node of your own it goes in
.env.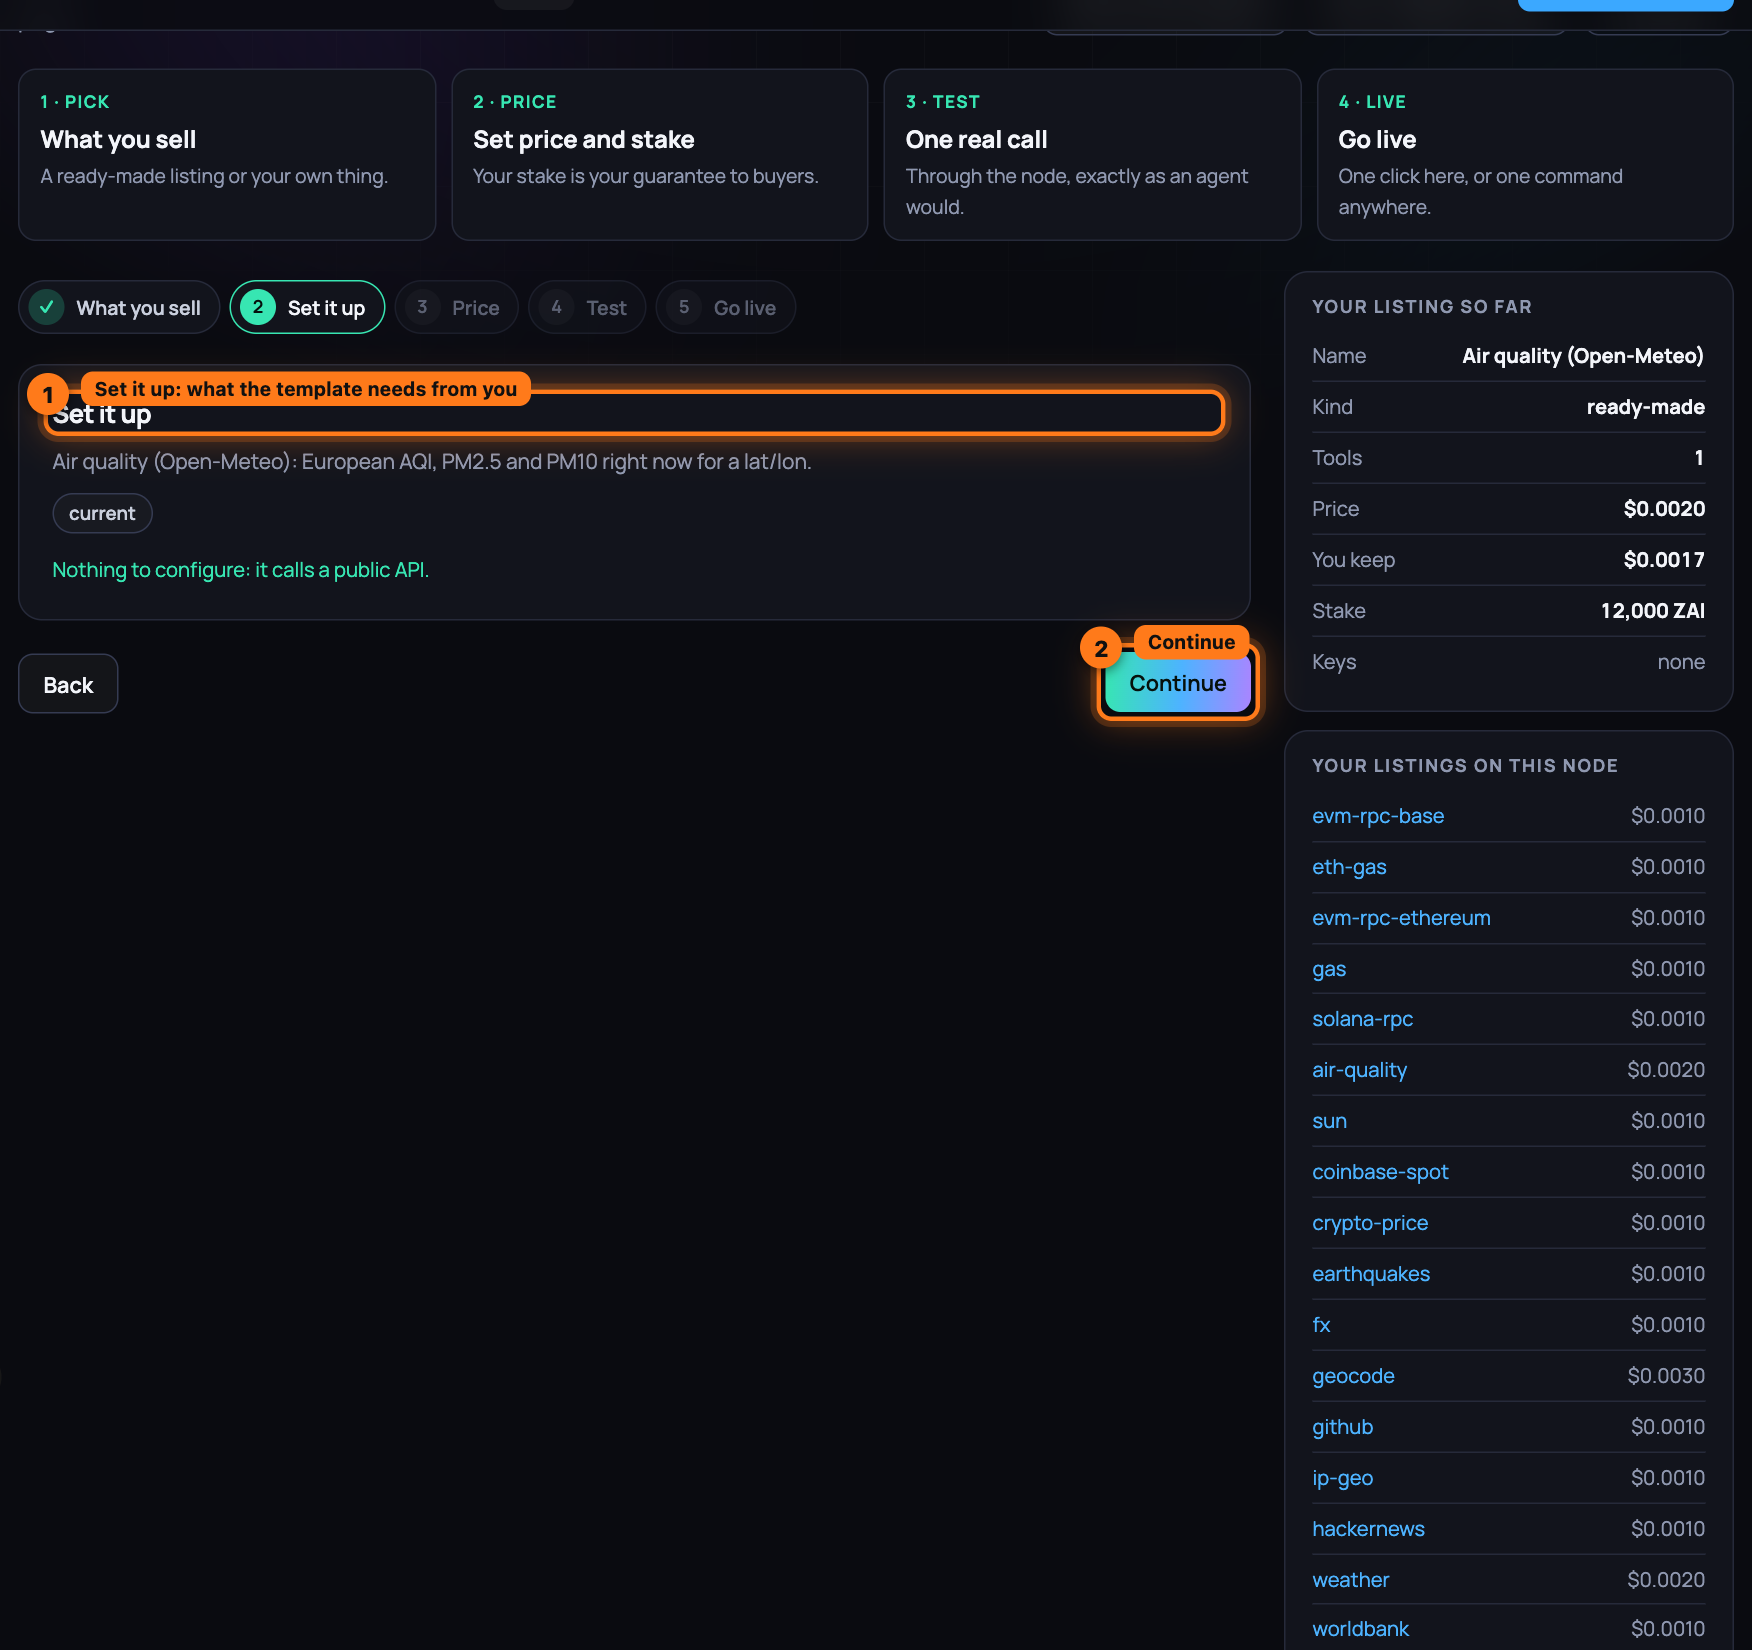
-
-
Press Continue.
-
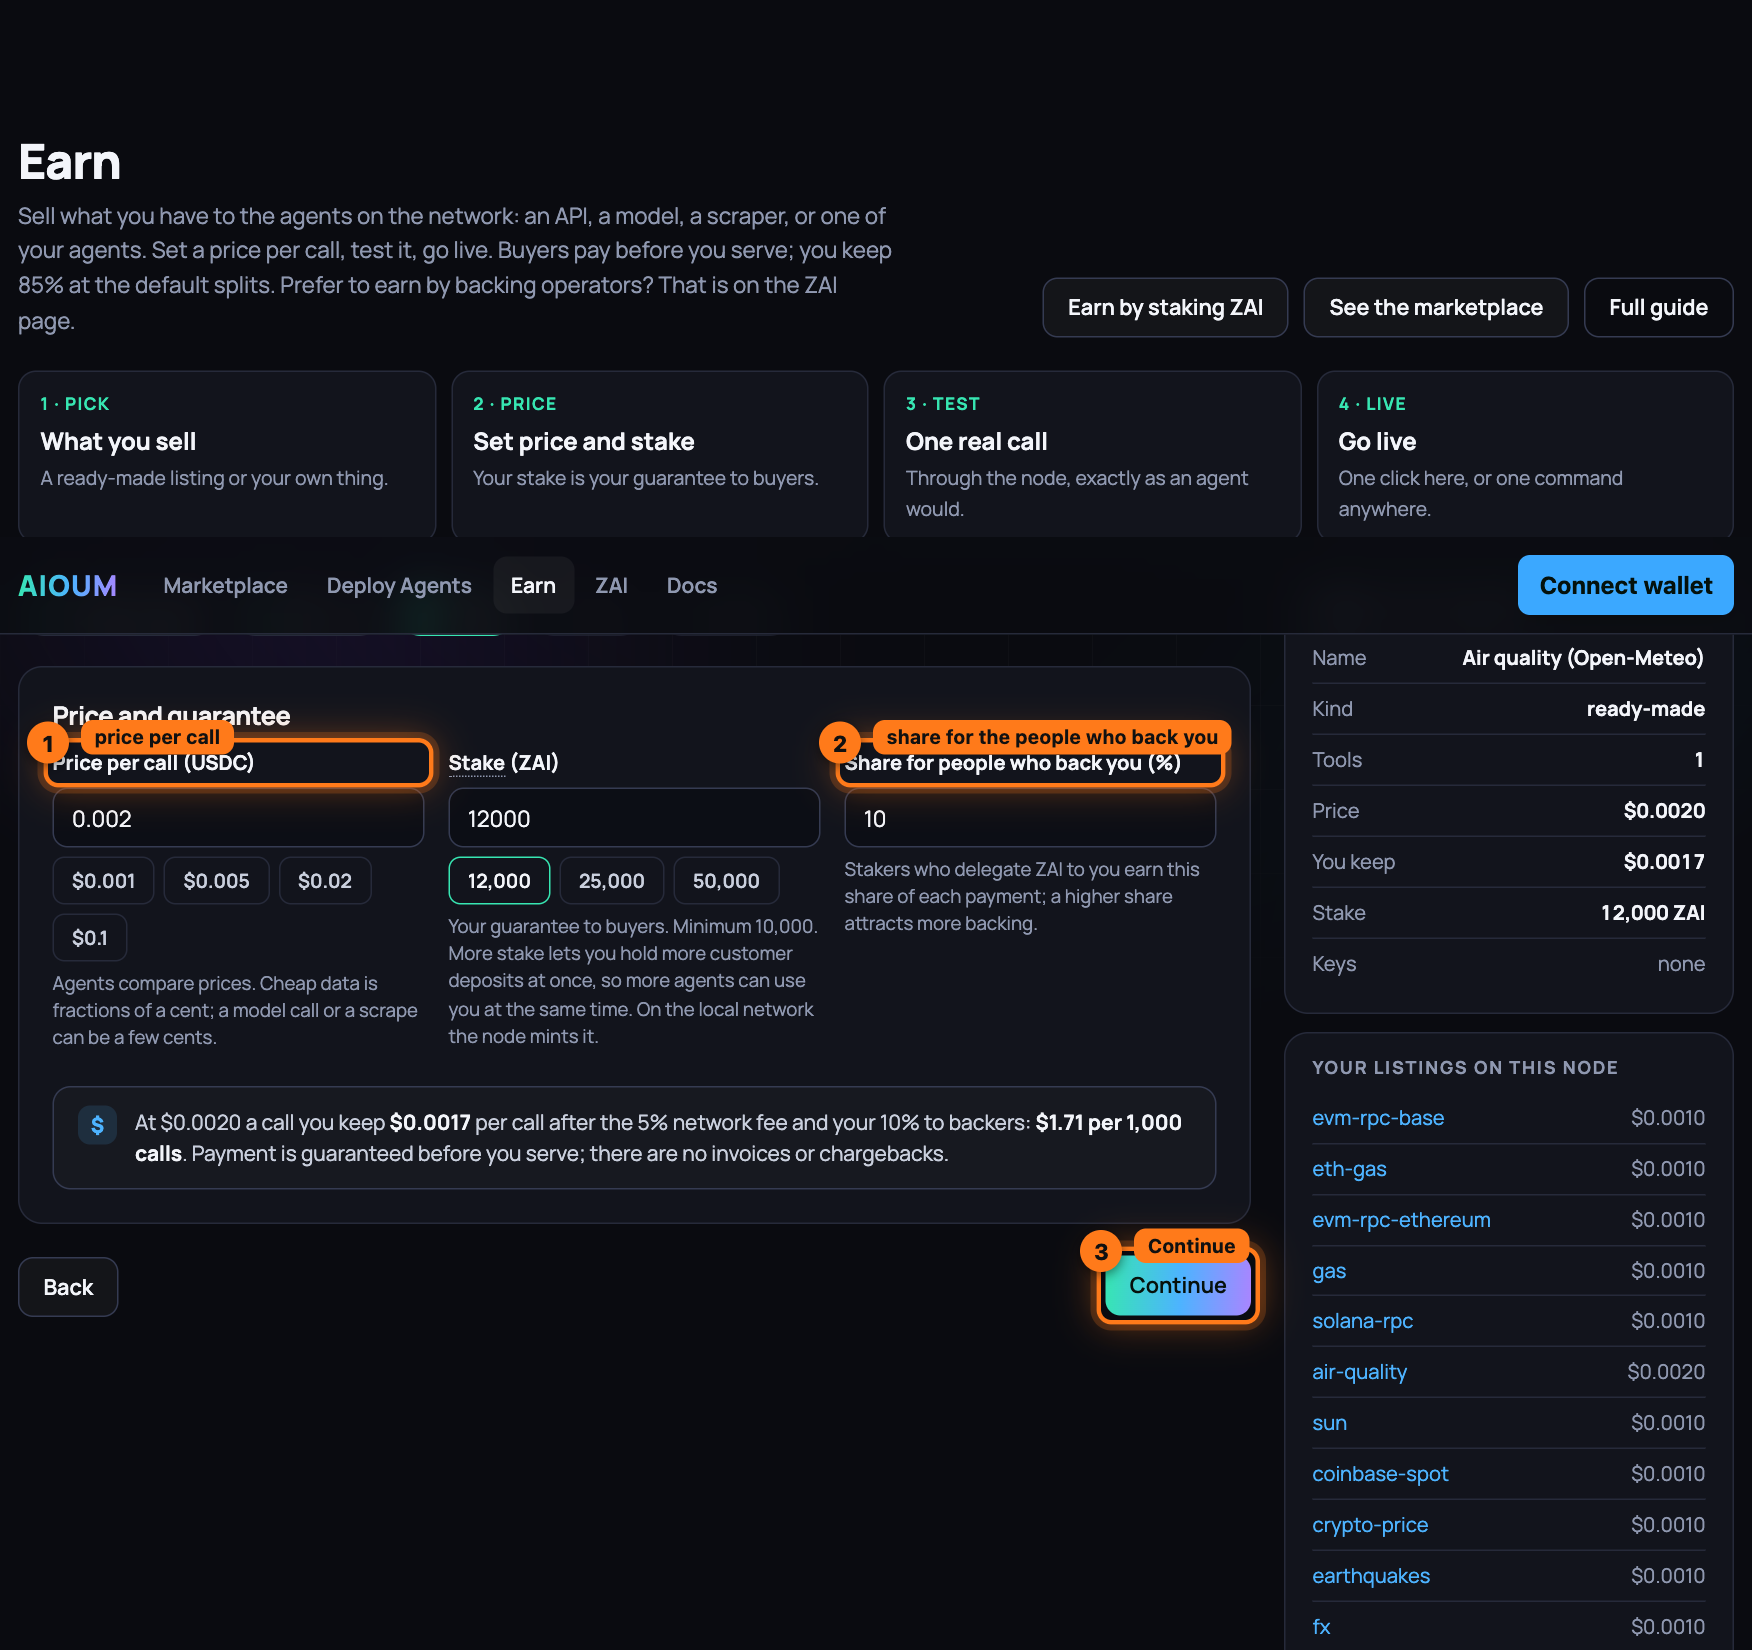
On Price and guarantee, set Price per call (USDC) (presets from $0.001 to $0.1; for a skill the field reads Price (USDC) · once per agent or · per load), tick Let the price follow demand, up to $ with a top price when you want the node to raise the price while calls queue and lower it when they stop (not for a skill), Your own stake (ZAI) (100 by default, at least 100; the listing is live at 10,000 total, the rest can come from the network's staking node or from backers) and Share for people who back you (%) (10 by default). The line below shows what you keep per call after the 5% network fee and your backers' share, and per 1,000 calls; Your listing so far on the right keeps the summary as you go.
-
Press Continue.
-
On Test it, choose the Tool if the listing has more than one, fill its inputs (a template arrives with sample values) and press Run the test call. The node makes one real call to your upstream, exactly as an agent would, and answers "It works" with the time it took and the output. Nothing is listed yet. If the screen says the local node is not reachable, run
scripts/devstack.sh reviewand press the button again.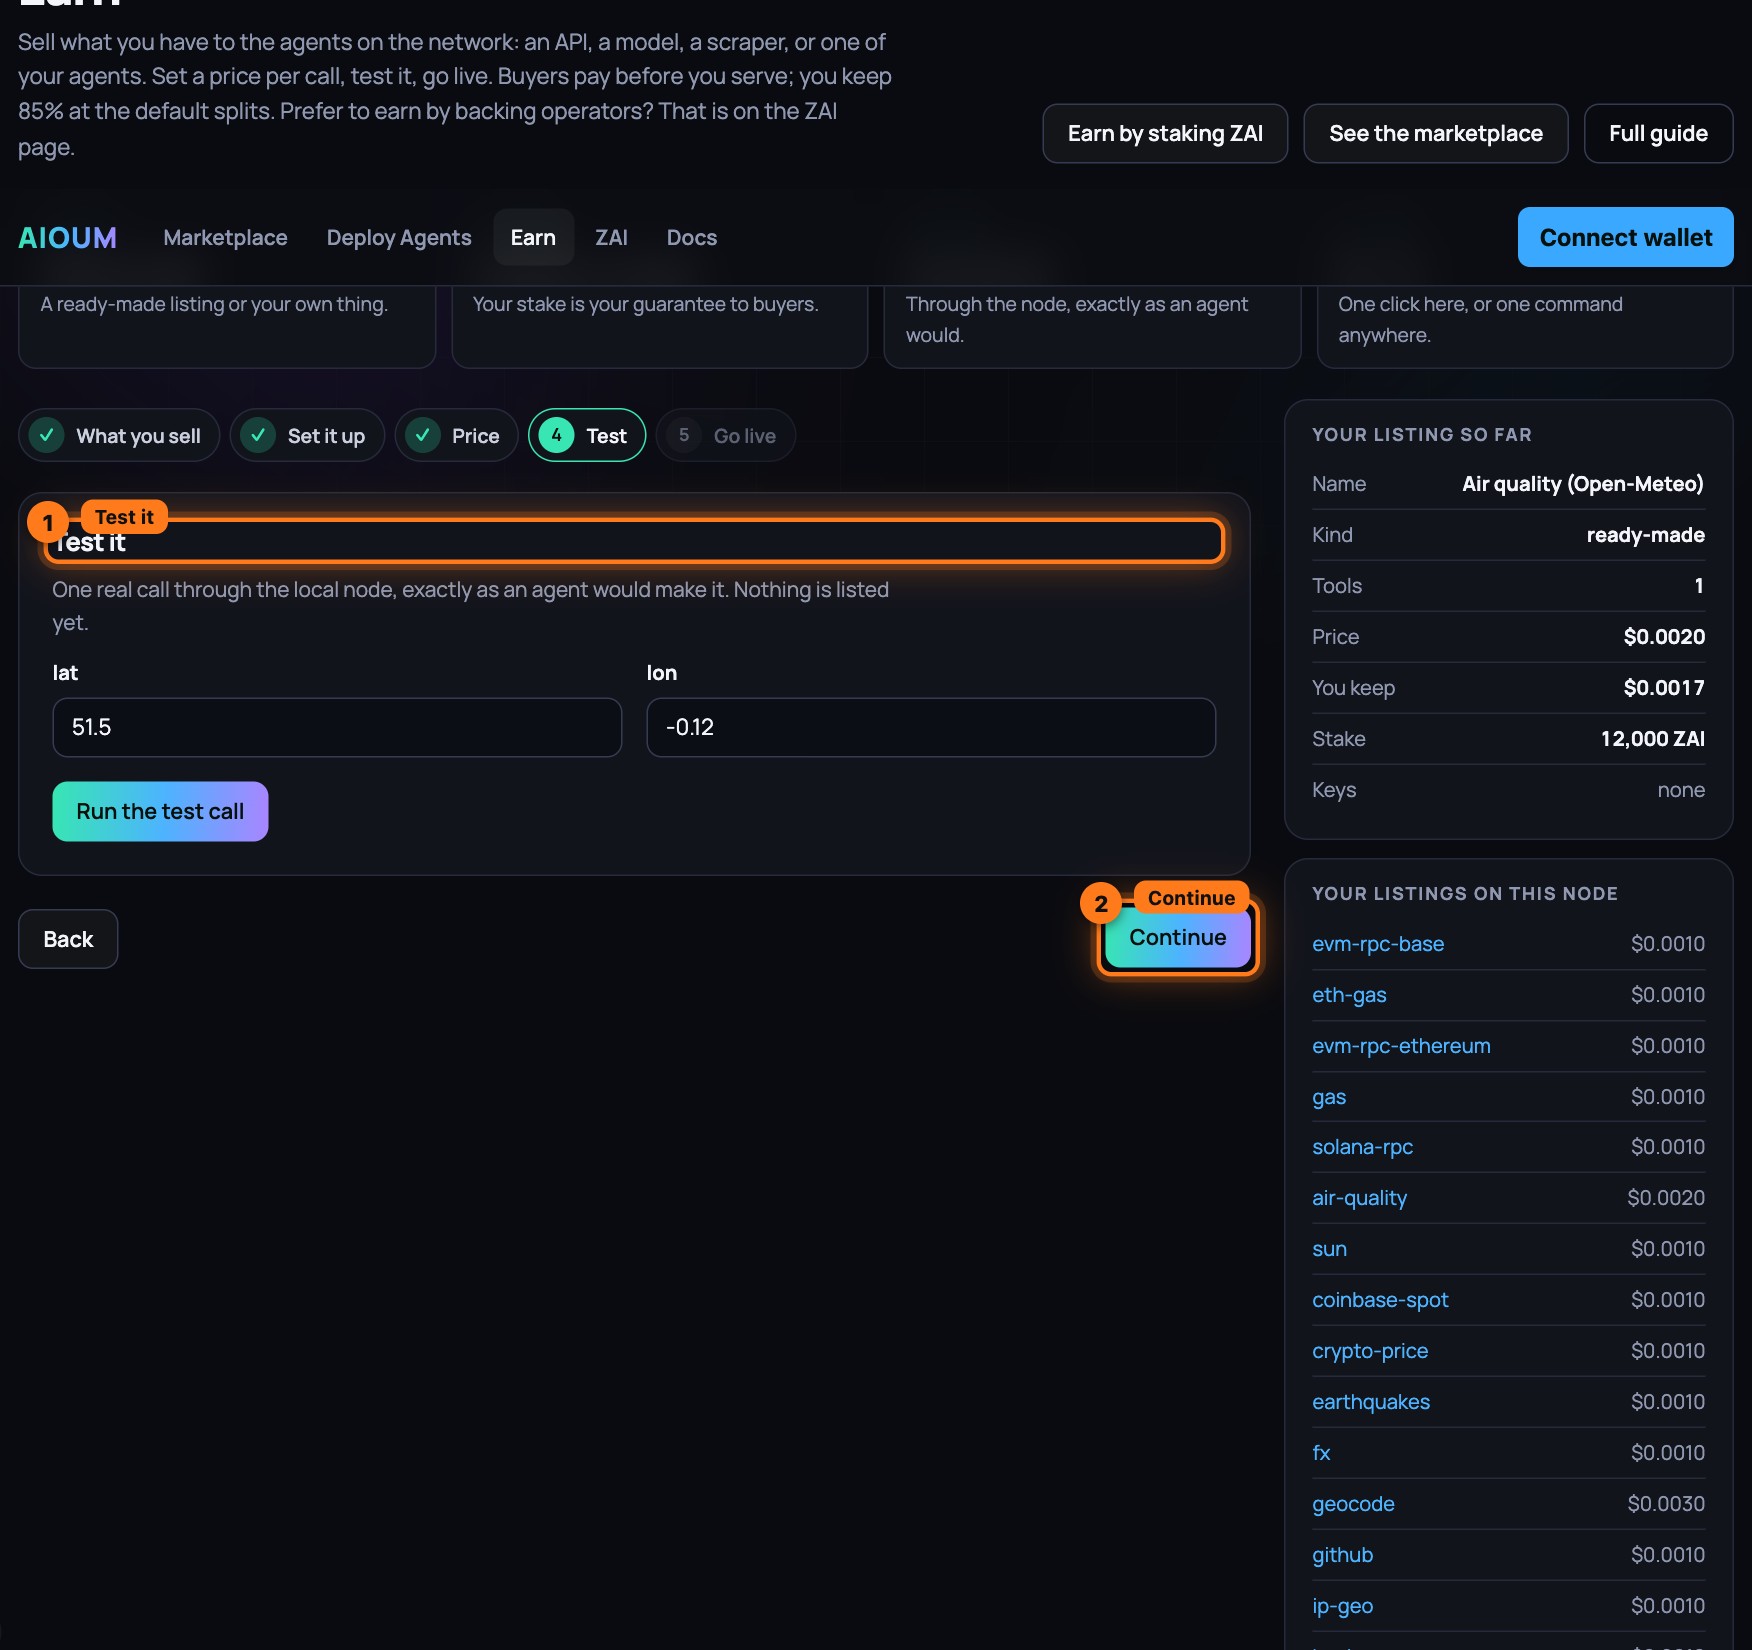
-
Press Continue.
-
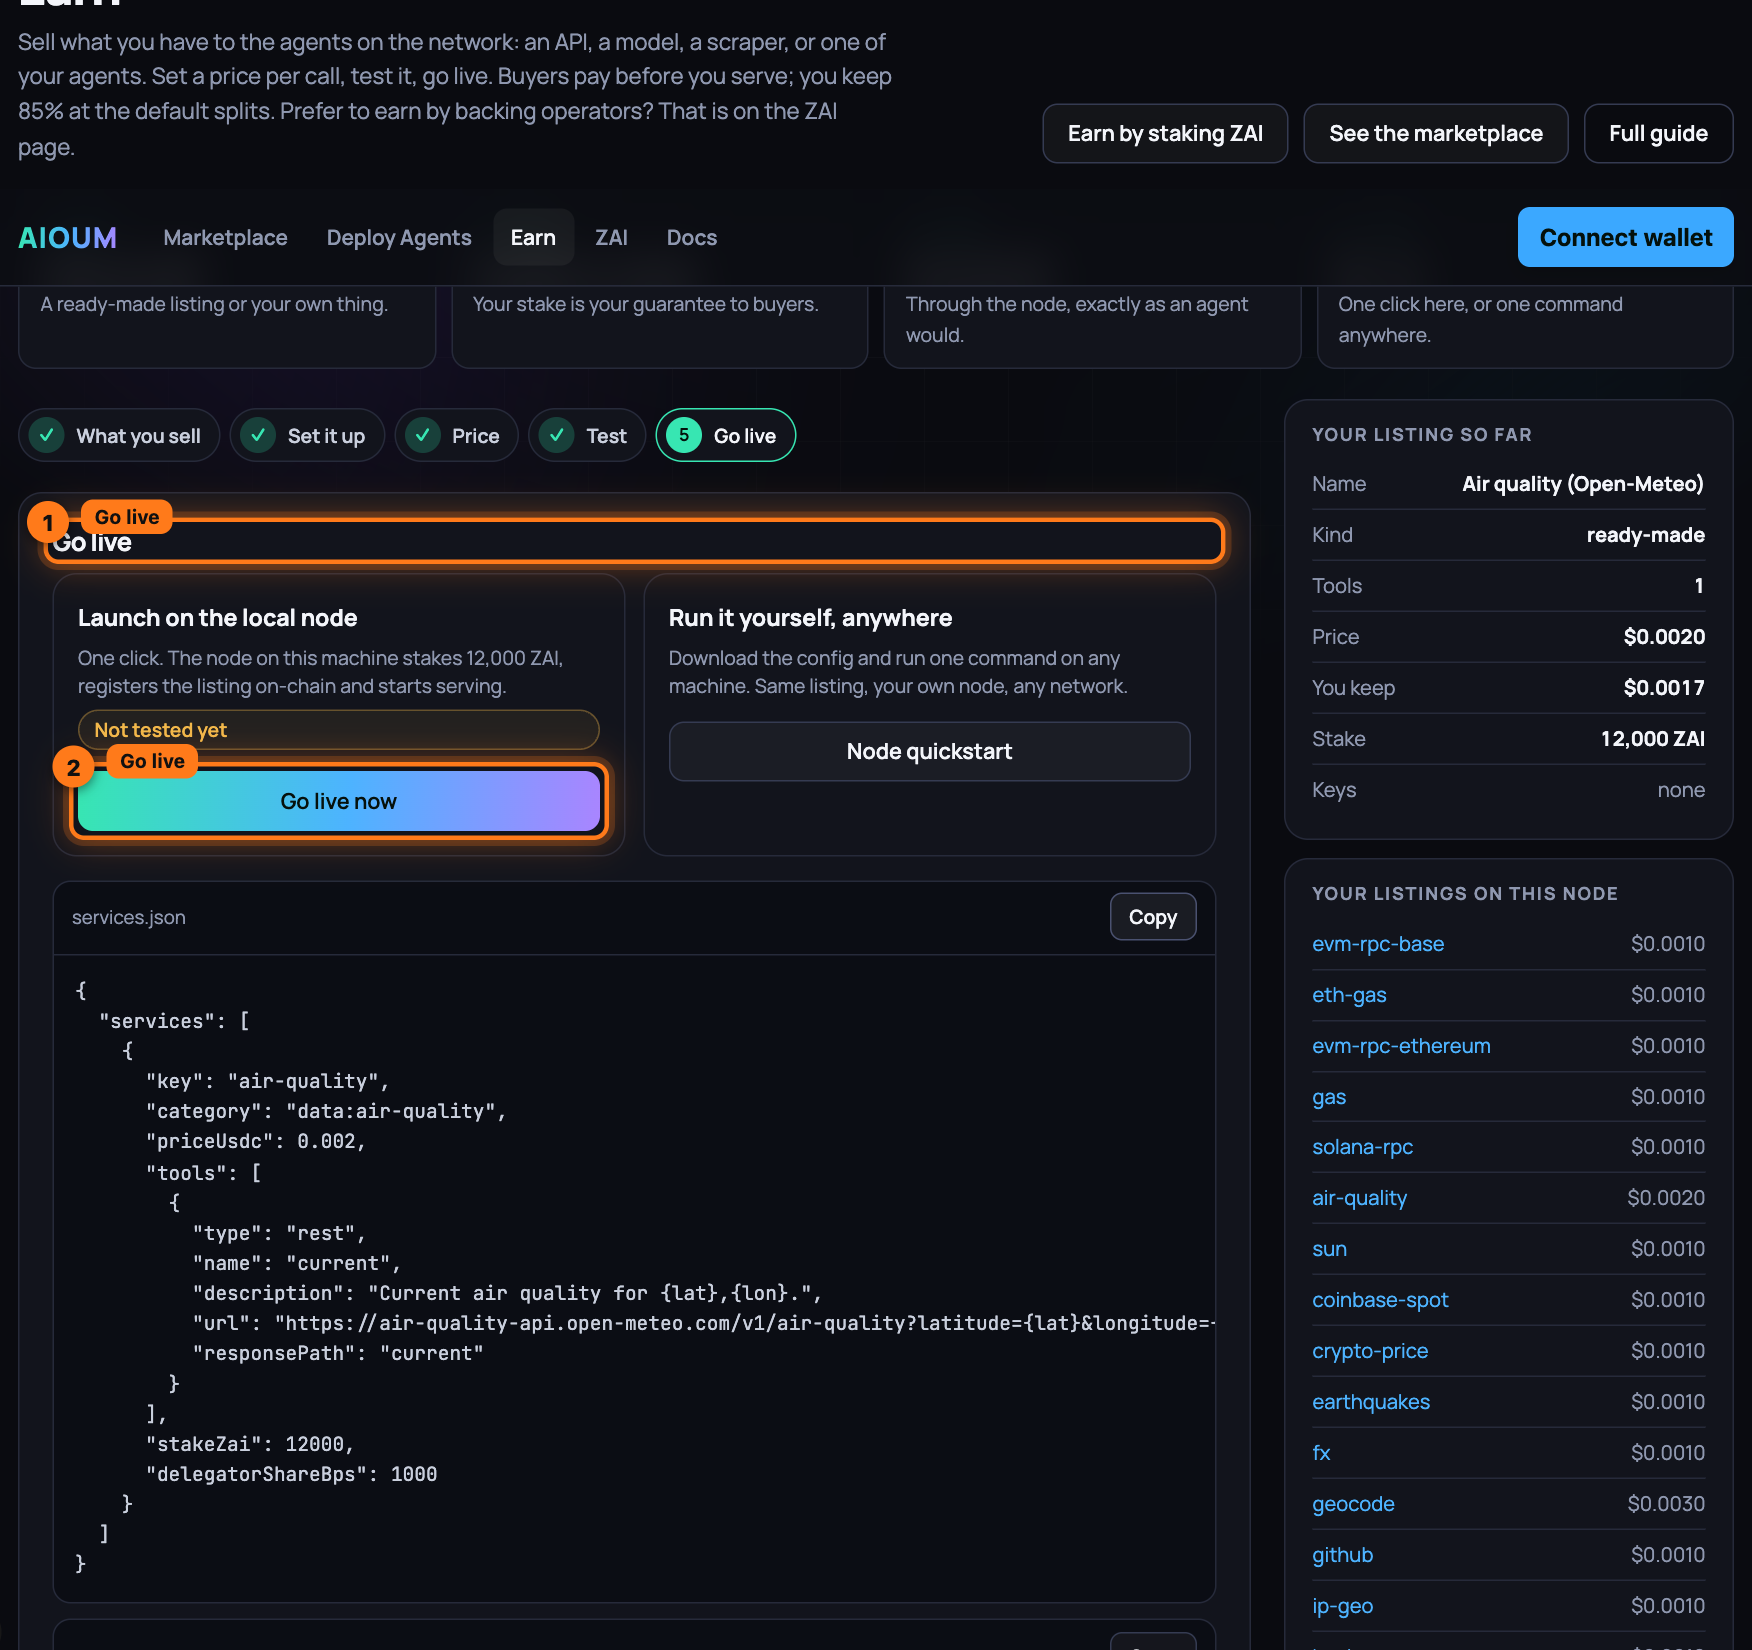
On Go live, take one of the two cards.
-
Launch on the local node: press Go live now. The app hands your listing and any pasted key to the node on the local development network; the node stakes the ZAI, registers the listing on-chain, starts serving it, saves it in its data directory so it survives a restart, and tells the indexer. A few seconds later the screen says You are listed, with the listing's key and its service number, and the Get backed to go live card under it (with 10,000 ZAI of your own it says You are live and no card follows).
-
On Get backed to go live, the card reads: your listing needs 10,000 ZAI total to go live, you staked 100, request the rest from the network's staking node. Press Request stake. The chip on the card says In review, pulsing, while the staking node checks the listing on your node, your own stake, disputes and slashes against you and the price against the gallery, makes one sample call through your node, then has its model read the listing against its rubric: seconds. Then one of:
- Approved, with "Backing 10,100 ZAI…" while the delegation lands and one paid call goes through your node;
- Live, with Live · 10,200 ZAI staked (100 yours, 10,100 backed) · capacity 3 sessions, what convinced the reviewer, and the delegation transaction. The listing takes paid calls from now on;
- Rejected, with the reviewer's reasons in plain words and Fix and request again, which takes you back to Set it up; Go live now then replaces the listing and the card is back.
The same card sits on your listing's page, and Your listings on this node on the right shows each listing's backing chip next to its price.
-
Run it yourself, anywhere: press Copy on each of the three boxes, services.json, .env and run it, and on the machine that will serve:
git clone https://github.com/oum-dev/aioum && cd aioum/offchain && npm ciSave the first box as
services.jsonand the second as.env; setAIOUM_NODE_TOKENto a long random string and fill in each key line. On the AIOUM network also setRPC_URLandOPERATOR_PRIVATE_KEY(or a keystore), put the network'sdeployments.jsoninoffchain/, and fund that wallet with the stake and gas. Then:set -a; source .env; set +a AIOUM_SERVICES_CONFIG=./services.json npm run multinode curl -s localhost:8546/services | head -c 400On boot the node stakes, registers the listing and serves it; the last command shows it with its id and price.
docker compose up -ddoes the same in a container and reads.envby itself. -
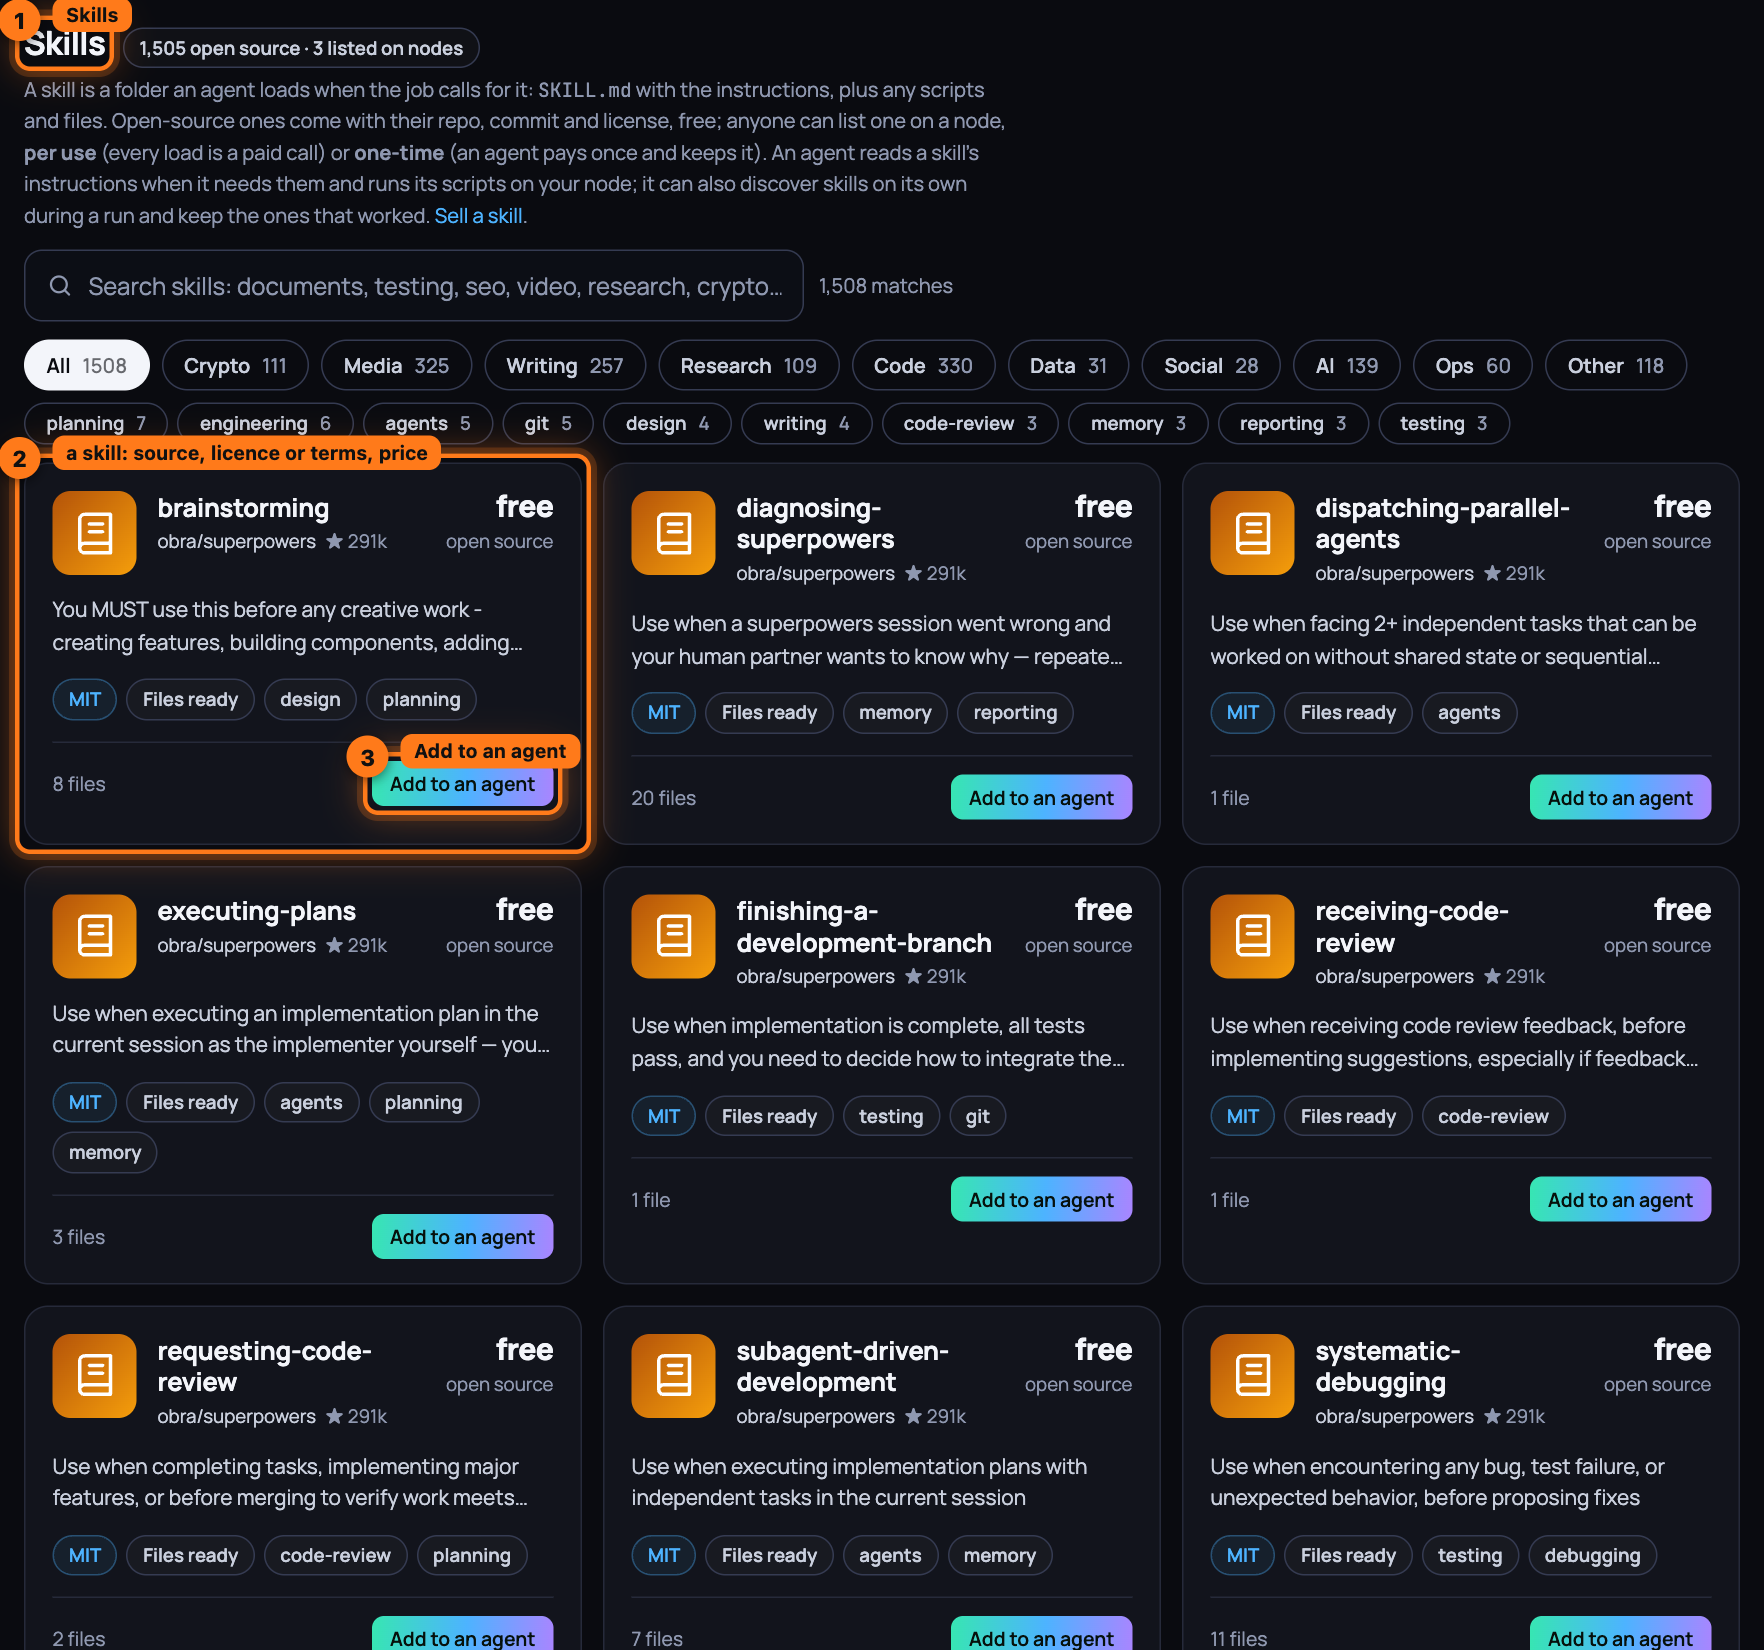
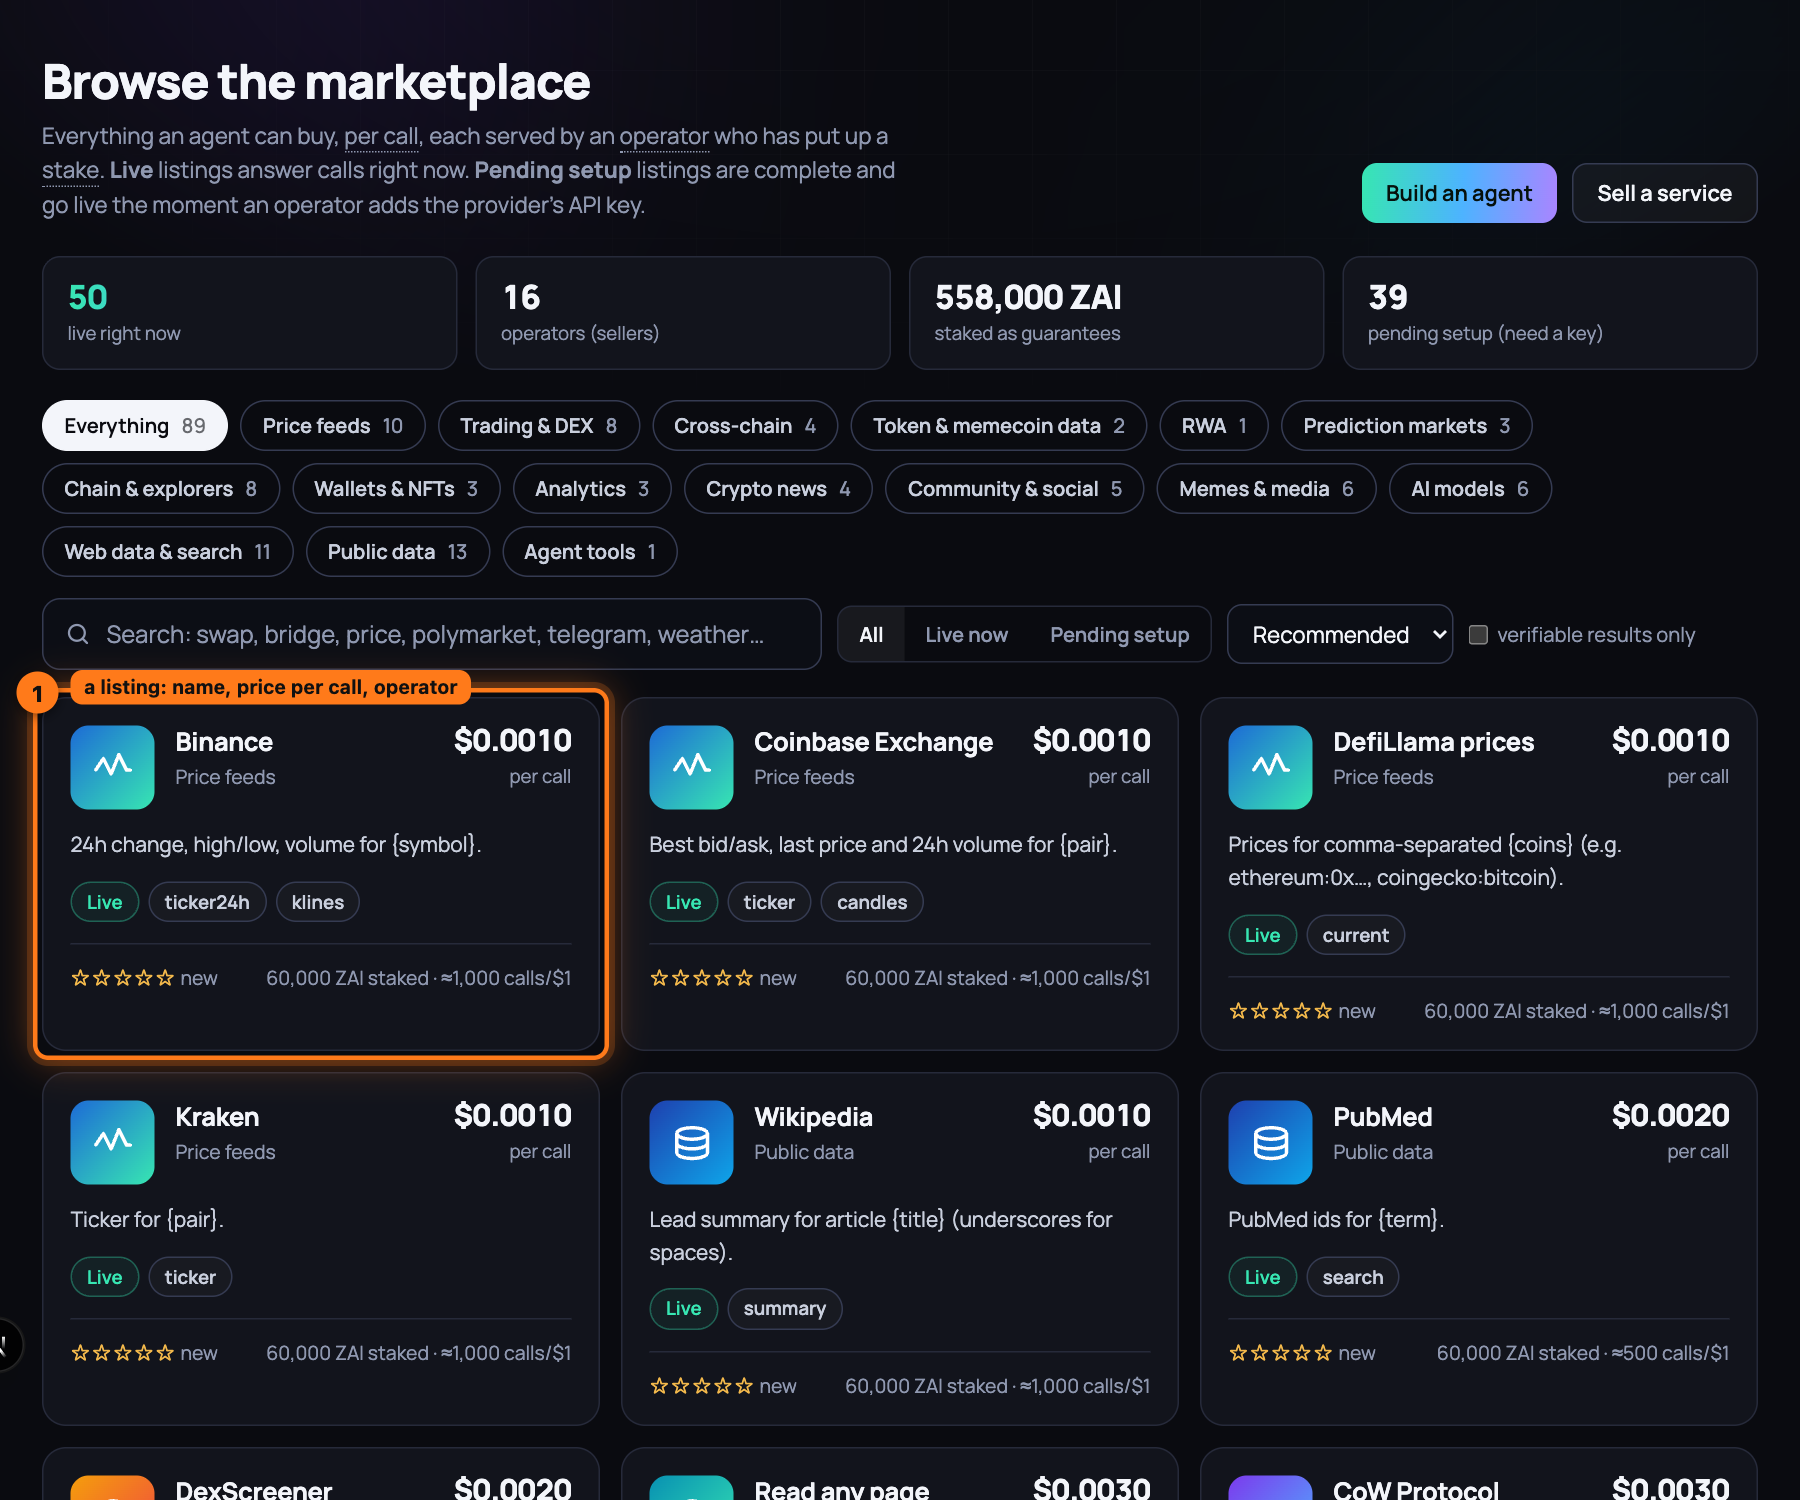
Press See your listing to open its page, Use it in an agent to drop it into an agent of yours, or Marketplace to see it among the others: name, group, price per call, a Live badge, its tools, the stake behind it and its rating, "new" until the first review; Verified live when its template's test call has passed, Reaches into its node for a server with host access, Needs a GPU with 12 GB and the like for a hardware floor, Official once your domain names your node. A skill sits in the marketplace's Skills section with its terms, One-time or Per use, and its price; the listing's page reads Skill · one-time.
-
Prove the API is yours, when it is. A listing that carries
provider.domain(the importer sets it from the spec's server host) shows Official once the domain names your node's operator. From a shell,npx aioum sell verify-domain api.example.comprints the two records, either one enough: a DNS TXT recordaioum-verify=<your operator address>on the domain, orhttps://api.example.com/.well-known/aioum.jsonwith{ "operators": ["0x…"] }. Add one and run it again:verified. The directory rechecks on every refresh, the card and the page carry the Official badge, and official listings rank first among live ones.
What you have now
A live listing with your price, your stake and your operator identity on-chain. An agent that picks it opens an escrow session and sends one signed receipt per call; your node serves each call and settles the latest receipt on-chain. Your net share, 85% of the price at the default splits, lands in the operator wallet as USDC at every settlement; your backers' share accrues in the staking contract. The agent then rates your operator identity from what it was served, and the next agent reads that rating before choosing you: quick, correct answers move you up; errors and slow answers cost you.
Next: Run a private node, step by step — a node of your own for the tools and data that must stay with you.